XNA Start - A first application
The notes on this page lead you through the creation of your very first XNA application. Make sure you have downloaded and installed the XNA Game Studio first. See the introduction notes for details: XNA
Creating a project
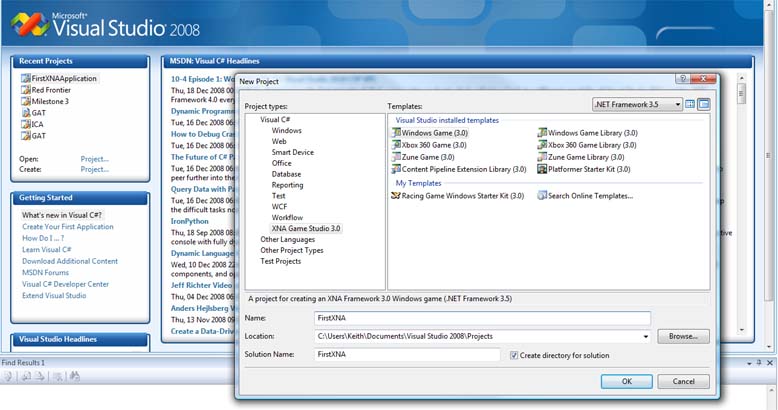
Start up Visual Studio and go to File / New Project. Expand the Visual C# project type on the left and select XNA Game Studio 3.0 (if it is not there you may not have installed it correctly). On the right hand side select "Windows Game" and give the project a name down the bottom as shown in this screenshot:

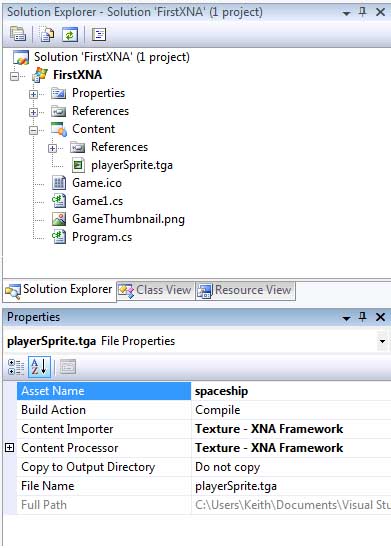
Press OK and Visual Studio will set up the project for you. It adds a number of files that can be seen in the solution explorer to the side of the window. The source code files are Program.cs which is the entry point of the application and simply runs the game (no need to edit this file) and Game1.cs which is a source file for a class Game1 which derives from the XNA framework class Game.
What has happened here is that XNA has already created a lot of code for you to help you write the game. This is in the framework class Game. In order for you to do your coding the Game class provides some functions that can be overriden by you. This is where you do all your code and interface with XNA. There are plenty of comments above each function describing their usage - I suggest you read over them now.
Exploring the provided code
XNA automatically adds two variables to your class, one of type GraphicsDeviceManager and one of type SpriteBatch.
GraphicsDeviceManager graphics;
SpriteBatch spriteBatch;
Note that the above variable will be null until new is used to create an actual object for them to refer to. Unlike in C++ there is no '*' to indicate they are pointers. For more information on this see: C# References. The object creation is done in the class constructor for the graphics and in LoadContent for the spriteBatch variable.
GraphicsDeviceManager - this is a class that provides functionality for us to interface with the graphics hardware of the platform. It is similar to the device used in native Direct3D.
SpriteBatch - this is a class that allows us to draw sprites to the screen (2D images)
Drawing a spaceship
For our first game let us simply draw a texture on the screen. XNA has built in support for art and other content (game assets) which is very easy to use. Unlike with other systems you do not need to create directories for your data and provide relative paths etc. instead you can place the data into your Visual Studio project and refer to it simply via a name. What is more it gets converted to a correct format automatically and when deploying to the Xbox 360 it gets copied over and converted automatically!
Adding a texture
Locate a texture on your computer (or download this one: PlayerSprite.tga) and simply drag the file onto the Content area in the solution explorer. You could also right click on Content and select Add New Item and do it that way but drag dropping is quicker and easier.
Highlight the texture in the solution explorer so you can see its properties below. Here you can give it a friendly name (asset name) that you can then use to refer to it in your code. Below I am calling it spaceship:

Now to use it in our game we need to create a Texture2D class. So add a playerTexture variable after the class definition and after the SpriteBatch definition like so:
Texture2D playerTexture;
XNA requires that we load all our game content in the one place and provides function called LoadContent for that purpose. After the spriteBatch creation in that function add:
playerTexture=Content.Load<Texture2D>("spaceship")
Now this may appear a bit confusing at first site. what is happening is that the Content helper object is loading the texture for us. It needs to know the type of thing to load (it can also load 3D models and other stuff) so it uses a 'Generic (similar to a template in C++) to allow differing types to be supported. We tell it that we want to load a content type of Texture2D and then provide the asset name we set earlier. Note that we never refer to the actual filename! We only ever refer to the asset name we set above.
OK we have loaded the texture so now we want to draw it the screen. We must do all our drawing in the provided Draw function so scroll down to that. You will see that it already is set to clear the screen to a Cornflower Blue colour (by all means change this to something better like black). After the TODO comment we need to insert the following code:
spriteBatch.Begin();
spriteBatch.Draw(playerTexture, Vector2.Zero, Color.White);
spriteBatch.End();
To anyone who has learned native Direct3D this will look very familiar and in fact a lot of the managed Direct3D used by XNA is very similar to what you will be used to - just much easier to use :)
When drawing sprites it is most efficient to draw them all in one go. That way XNA can optimise its drawing. To take advantage of this we need to tell XNA when we are starting to draw 2D sprites and when we are going to finish hence the begin and end calls.
The draw function is overloaded and so there are a number of options. Above I have chosen one that takes the asset name, the destination as a 2D vector and a colour that can be used to tint the texture. For this example I have just provided a null vector which means the texture will be displayed at 0,0 and a white colour tint (modulation) which means no change to the image.
Run your code now and you see see your spaceship. If there are any problems then review your code with the notes above.
Advanced note: there are overloaded versions of the spriteBatch begin function and it may be necessary to use one to make the sprite batch reset graphic states back to what they were. For more details on this see the 3D Models note here: Model not looking right.
Controlling the space ship
XNA provides support for the Xbox 360 controller and for a keyboard and mouse when deployed to a PC. If you look in the Update function you will see that XNA has automatically added a line to allow exit from the game via the Xbox 360 back button. It does this as otherwise when deploying to an Xbox 360 you would have no way of exiting your application!
Each method of control has a class in the framework already made for you to use. There are ones for GamePad, Keyboard and Mouse. Note that you will need to support the GamePad if you are deploying to an Xbox so it is common to support the pad and the keyboard and mouse even if not using the pad on the PC. First lets add a means of exiting the game using the keyboard:
if (Keyboard.GetState().IsKeyDown(Keys.Escape))
this.Exit();
Run this and you should see that pressing the escape key will exit the application.
What we would really like though is to be able to move the spaceship around. To do this we will need a variable to represent the spaceships on screen position. If you look back at the sprite draw method you will see the second parameter is used to specify the screen position. It is a 2D vector so has x and y variables. Create a member variable for the spaceship's screen position below where you declared your texture.
Vector2 playerPosition=vector2.zero;
Note that the Vector2 type does not need instantiating (you do not need to use new - it is not a reference type). This can be strange to someone coming from C++. Basically in C# the built in types like int, float etc. do not need instantiating (they go in stack memory) but reference types like classes do need to be instantiated (they go in heap memory). Unlike in C++ where a structure is just a class with all public data in C# it is quite different and is actually treated just like a built in type and placed on stack memory so needs no instantiating.
Another difference in C# over C++ is that we can set initial values for class variables where we define them. In C++ you cannot do this but instead need to set the initial value in the class implementation (often in the constructor). Since this often leads to bugs due to forgetting to initialise variables it is actually good that C# allows an initial value to be set and you should use this facility. Note that if you do not provide an initial value C# will assign one for you e.g. null for a reference type. In the code above I have set the vector to zero which means both elements (x and y) will be 0. This will show the spaceship at the top left position on the screen.
Now change your drawing code to take the player position variable like so:
spriteBatch.Draw(playerTexture, playerPosition, Color.White);
Now we want to be able to move the space ship so back in the Update function we can add some code to allow input to alter the position variable e.g.
if (Keyboard.GetState().IsKeyDown(Keys.Left))
playerPosition.X--;
if (Keyboard.GetState().IsKeyDown(Keys.Right))
playerPosition.X++;
If you run your application now you will find the keyboard arrow keys move the spaceship left and right.
You could do the same for the up and down arrow keys. You may also wish to have the Xbox controller do the same. Perhaps by using the D-pad. e.g. to move down:
if (GamePad.GetState(PlayerIndex.One).DPad.Down == ButtonState.Pressed)
playerPosition.Y++;
Hopefully you have now seen how easy and quick it is to get game mechanics up and running with XNA. Everything 'just works' and intellisense works brilliantly compared to C++ coding!
Further Reading
© 2004-2016 Keith Ditchburn

