XNA Simple Triangle
This page describes how to draw a simple triangle to the screen in XNA. It introduces a lot of the 3D concepts needed for later, more complicated, 3D geometry rendering. In order to keep this relatively simple a lot of detail is left for you to follow up on via the links to the detailed pages.
Vertices
To draw a 3D triangle we are going to need to define three vertices for the corners. We are also going to need to position the camera so it looks straight onto our triangle. Since our triangle has no depth we would not see it from the side. We would also not see it from behind as the back face of triangles are not drawn (back face culling) for optimisation purposes. Our vertices are defined in 3D world space so we have three values x, y and z.
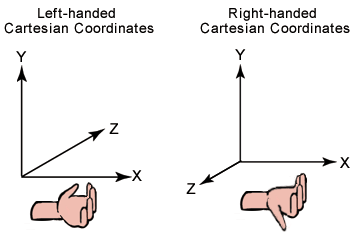
XNA uses the Right-handed co-ordinate system

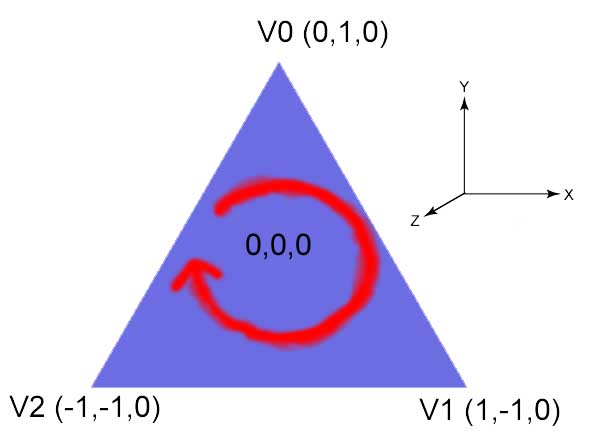
So for our triangle

Note: the vertices are defined in a clockwise order (known as the winding order). It is important to get this right as if you do it counter clockwise your triangle will not be visible as the rendered will believe it is a back face and will cull it. This is actually a bit bizarre as normally left handed system require clockwise definitions and right handed anticlockwise. Microsoft seem to have mixed up the two!
Types of vertex
Rendering in XNA involves drawing and shading triangles made up of three vertices. There are many ways of drawing a triangle. For example it can be lit by lighting in the scene, it can have a texture applied to it or it can be a solid colour or some combination of these. Different information needs to be held per vertex depending on how you want the triangle drawn. For this example we do not want to have to set up lighting and textures etc. and so instead we shall use a vertex with a solid colour.
XNA provides a structure for this purpose called VertexPositionColor. We will need three of these to define our triangle so in your code add a member array variable:
VertexPositionColor []verts;
We will need to instantiate this array, so in the LoadContent function:
verts=new VertexPositionColor[3]
Now we need to fill in the data. VertexPositionColor has a field for position and for colour.
verts[0].Position = new Vector3(0,1,0);
verts[0].Color = Color.Blue;
verts[1].Position = new Vector3(1,-1,0);
verts[1].Color = Color.Blue;
verts[2].Position = new Vector3(-1,-1,0);
verts[2].Color = Color.Blue;
I have set the colour of each vertex to blue for the time being to draw a blue triangle however we could set each vertex to a different colour. If we do this XNA when drawing our triangle will interpolate the colour across the triangle. We can try this later.
Drawing the triangle
To draw the triangle we are going to use the DrawPrimitive member function from the graphics device. This function takes a type of vertex and how many to draw. However before using this we need to do a few initial steps
Shaders and Effects
All drawing in XNA is achieved using shaders. These are pieces of code normally running on the graphic card that do the actual pixel by pixel drawing. You can create your own, often complex, drawing effects using HLSL (Higher Level Shading Language) however the standard shaders are provided for you. In order to tell XNA about the make up of our vertices and hence how they should be drawn we need to set the vertex declaration in the graphics device.
GraphicsDevice.VertexDeclaration= new VertexDeclaration(GraphicsDevice, VertexPositionColor.VertexElements);
Here we are telling XNA that the drawing we are about to do will be using VertexPositionColor vertices. XNA then knows to use a shader that can draw using these types of vertices.
The next step is to create an effect class instance. This class is used to specify the matrix to use and to control the actual rendering.
BasicEffect effect = new BasicEffect(GraphicsDevice, null);
The effect has many properties that can be set to control rendering. For this example we will just set the required matrices. We need to set a matrix that will be used to convert our triangle from model space into world space (world matrix), another to convert from world space into view space (view matrix) and finally one to project from view space into screen space (projection matrix).
We have defined our triangle centred around zero and so for this example there is no need to transform it anywhere else in our game world so we can just set the world matrix to identity:
effect.World = Matrix.Identity;
The view matrix is used to transform 3D objects so they look correct from the point of view of the viewer (or camera). Ultimately we will want to create a camera class allowing us to move this view point however for this example we will just create a matrix defining the camera a bit back from 0,0,0 and pointing at 0,0,0. XNA provides a matrix function to help with this called CreateLookAt
effect.View = Matrix.CreateLookAt(new Vector3(0, 0, 5), Vector3.Zero, Vector3.Up);
For more information on the Matrix used by XNA see: XNA Matrix
This method takes vectors for the camera position (I set it 5 back in Z), the camera target (0,0,0) and which way is up (this is 0,1,0 which can also be provided by the Vector3 class via the Up method). The method needs to know which way is up as we could be standing on our heads in a certain position looking at a certain point!
The next matrix to set is the projection matrix. This is the one that is used to map from 3D onto the 2D screen. In order to do this it projects the vertices into 2D. Typically we use a perspective projection here. The matrix is also used to specify the closest and furthest away points we wish to draw (the near and far plane).
XNA provides a method called CreatePerspectiveFieldOfView which takes the field of view, aspect ratio and near and far planes. The field of view in our example is set to PI over 4. The aspect ratio is normally set to the width of the screen divided by the height.
float aspect=(float)Window.ClientBounds.Width / (float)Window.ClientBounds.Height;
effect.Projection = Matrix.CreatePerspectiveFieldOfView(MathHelper.PiOver4, aspect, 1, 100);
The final property we need to set is one to tell the effect to render using the colour defined in the vertex:
effect.VertexColorEnabled = true;
Effect passes and techniques
As I mentioned earlier there are many ways to shade the triangles when they are drawn to screen. Some of these methods (techniques) require more than one pass to achieve. In other words they need to do some rendering to the screen and then do more rendering on top of what they have already rendered. When using the build in shaders we do not need to worry about how many passes there are or what is being done in each pass but we still need to loop through the passes so XNA can carry out the correct shading in the background. The first step is to tell XNA that we are beginning to draw using our new effect:
effect.Begin()
Next we need to loop through each pass in the current technique and begin the pass, do our drawing (not shown yet) and end the pass. Once all passes are complete we tell XNA we have finished using this effect by calling effect.End()
foreach (EffectPass pass in effect.CurrentTechnique.Passes)
{
pass.Begin();
// Call draw user primitive here
pass.End();
}
effect.End();
Finally lets draw it
We can use a method of the device called DrawUserPrimitives to actually draw our triangle (in fact this is not the fastest method however it is fine for this example). This method is a generic (like a template in C++) so is created using our vertex type. The method then takes parameters defining how our vertices should be converted into triangles, the actual vertices themselves, where to start drawing in our vertex array and how many primitives (triangles) we wish to draw.
GraphicsDevice.DrawUserPrimitives<VertexPositionColor>(PrimitiveType.TriangleList, verts, 0, 1);
In this case I am specifying that our vertex buffer contains vertices for triangles laid out in a list. So the first three are the first triangle. The second three the second triangle etc. In our case of course we are just drawing one triangle.
The results
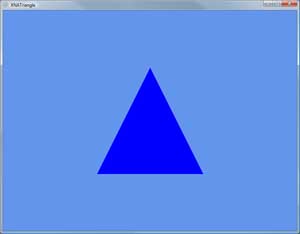
If you run your code now you should see the following

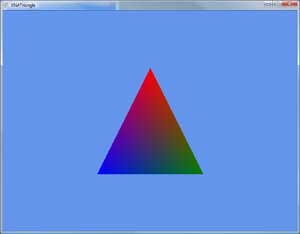
Earlier I mentioned that the shader effect would interpolate colours across the triangle if each vertex had a different colour. Go back and set the vertex colours to Red, Green and Blue and you should get something like this:

Summary
The above notes describe the processes required to render a 3D triangle using XNA. There are quite a lot of new concepts here and you would not be expected to understand it all yet. Further notes on this site describe in much more detail the different vertex types, shaders, effects, matrices etc.
Further Reading
- For more information on the Matrix used by XNA see: XNA Matrix
- XNA notes index
- C# notes
© 2004-2016 Keith Ditchburn

