Clipping
Sometimes we may wish to draw our sprites partially off the edge of the screen. To do this we need to clip the sprite to the edge so we do not attempt to draw outside the screen buffer.
A simple solution to this would be to do tests at the pixel level. So while blitting for each pixel we would write code to see if it is on the screen. If it is not we would simply not draw it. While this is a nice easy solution it is also very slow. To do tests per pixel is the worst thing we can do in terms of speed. Optimisations should always attempt to remove tests from code that is executed most often 'up' to code that is executed less often. It is much better to work out the area to be blitted before doing the blit.
Our blit function will therefore always be passed a valid area to be drawn, an area that is within the buffer. This means we will need two functions, the first tests for areas to be drawn and clips accordingly the second is the blit that does the actual copying.
Clipping Function
The input to our clipping function will be two rectangular areas. One representing the area of the source to be drawn e.g. a texture and another representing the destination buffer e.g. the screen. In addition we will need a pointer to the start of the destination buffer and an x,y position where we wish to start drawing.
void ClipBlit(BYTE *destination, const CRect &destinationRect, const CRect &sourceRect, int xPos, int yPos);
Where CRect is a simple class with left, right, top and bottom data members representing a rectangular area.
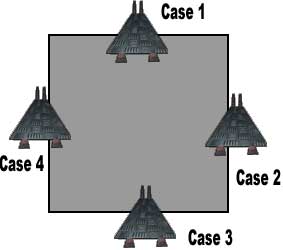
Our function needs to work out, based on the input, a rectangular area of the source that is within the destination. It then calls the actual blit function with this new rectangle. In addition the position to start drawing may need to be altered. Consider the following scenarios:

Case 1
The rectangular area of the source will need altering as will the position to start drawing. In this case the top member of the rectangle will need changing and the y position altering to be on the screen (set to 0).
Case 2
Just the rectangular area will need altering. In this case the right member of the rectangle will need changing.
Case 3
Just the rectangular area will need altering. In this case the top member of the rectangle will need changing.
Case 2
The rectangular area of the source will need altering as will the position to start drawing. In this case the left member of the rectangle will need changing and the x position altering to be on the screen (set to 0).
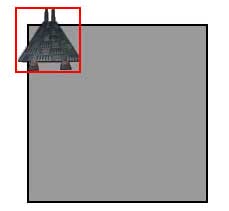
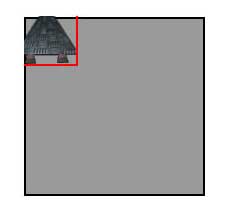
The most difficult scenario is:


In this case we need to adjust the rectangle top and left members and also set both x and y drawing positions to 0.
Solution
Initial approaches to this problem often involve writing code to try to handle every case individually. Unfortunately this soon leads to complex and tangled code.
A better approach is to consider the problem from the perspective of drawing 'spaces'. The source rectangle is specified in 'source space'. Its data members are relative to the source e.g. for a one frame 64 by 64 texture its members would be: left=0, right=64, top=0, bottom=64. The destination rectangle is in 'destination space' for example if it were a screen of 800 by 600 its members would be left=0,right=800, top=0, bottom=600.
The Algorithm
In order to carry out our clipping we need to convert our source rectangle into destination space, clip it and then convert it back into source space. The steps for clipping then becomes:
- Convert the source rectangle into destination space
- Clip against the destination rectangle
- Convert it back into source space
- Clamp negative position values to 0
Following these steps will work for every one of our cases.
1. Convert the source rectangle into destination space
To convert from source space into destination space we simply add the position values to our rectangle values:
left+=posX;
right+=posX;
top+=posY;
bottom+=posY;
2. Clip against the destination rectangle
Both rectangles are in screen space so we can clip by clamping the source rectangle to the destination rectangle e.g.
if (source.left<destination.left)
source.left=destination.left;
And so on for each edge.
3. Convert it back into source space
To convert back into source space we do the opposite of step 1, we subtract the position values from the data.
4. Clamp negative position values to 0
This is a simple check to see if the position values are less than 0, e.g.
if (posX<0)
posX=0;
if (posY<0)
posY=0;
Complication - Animation
In the case where the source rectangle is a frame from a larger texture used for animation we only want to work with a zero based source rectangle and then factor the source frame position back in again at the end of the process. For example we can create a source rectangle to work with at the start of our function:
sourceRectAdjusted.left=0;
sourceRectAdjusted.right=sourceRect.right-sourceRect.left;
sourceRectAdjusted.top=0;
sourceRectAdjusted.bottom=sourceRect.bottom-sourceRect.top;
We then carry out the steps above but prior to carrying out the actual blit we factor the frame position back in again:
sourceRectAdjusted.left+=sourceRect.left;
sourceRectAdjusted.right+=sourceRect.left
sourceRectAdjusted.top+=sourceRect.top
sourceRectAdjusted.bottom+=sourceRect.top
Further Reading
On this site: Blitting
© 2004-2016 Keith Ditchburn
