
Vertex & Index Buffers in Direct3D
These notes describe the process of creating the buffers necessary to render the low level primitives (triangles) using Direct3D. Before reading this page you should have read the notes on flexible vertex formats - FVF
Vertex Buffers
Each triangle has 3 vertices. A vertex can contain different information (it always has a position) and the type of information it holds is up to you and defined in your own structure. These notes assume a CUSTOM_VERTEX vertex structure is used with an FVF called D3DF_CUSTOMVERTEX.
Creating
As usual we declare a pointer to the vertex buffer Direct3D object. We then call an API function to create an instance of the vertex buffer object and point our pointer at it.
LPDIRECT3DVERTEXBUFFER9 m_vb;
HRESULT CreateVertexBuffer(UINT length, DWORD usage, DWORD FVF, D3DPOOL pool, IDirect3DVertexBuffer9** vertexBuffer, HANDLE* handle );
- length - size of the vertex buffer in bytes. E.g. if we wanted 4 vertices using our CUSTOM_VERTEX structure we would write: 4*sizeof(CUSTOM_VERTEX)
- Usage - Allows you to indicate how you will use this vertex buffer. It is good practice to tell Direct3D that you will only ever be writing to this vertex buffer, this causes a speed increase. See the notes on D3D Resources for further details.
- Fvf - the flexible vertex format (FVF) you are using for your vertex.
Pool - where in memory you want this to be held. Use D3DPOOL_MANAGED to let Direct 3D handle where to put it:. See the notes on D3D Resources for further details. - vertexBuffer - the address of your declared vertex buffer pointer. After this call has succeeded it will point your pointer at the created vertex buffer object. So this may be: &m_vb
- handle - this is never used, always set it to NULL.
E.g. to create a vertex buffer to hold 4 vertices of our custom vertex type we would write:
HRESULT hr=gD3dDevice->CreateVertexBuffer( 4*sizeof(CUSTOMVERTEX),
D3DUSAGE_WRITEONLY, D3DFVF_CUSTOMVERTEX,
D3DPOOL_MANAGED, &m_vb, NULL );
Remember to check the return code for success. If it fails you will get a reason shown in the Viz output pane (as long as you run using F5 and not the exclamation mark in Viz and have Direct3D set to debug mode).
Filling the vertex buffer
When creating the vertex buffer you specify how many vertices will be held. You can now fill in that number of vertices. Because vertex buffers can often be held in video card or AGP memory you need to lock the vertex buffer before you can read or write to it. Note: doing this a lot at render time can cause slow down as it stalls the video card, so try to only do it once when initialising. If you must do it dynamically each render loop do it quickly. Lock the buffer, copy the data and unlock as fast as you can.
The lock call returns a pointer to the vertex buffer memory area:
HRESULT Lock( UINT OffsetToLock, UINT SizeToLock, VOID **data, DWORD Flags );
- OffsetToLock, SizeToLock - if you want you can just lock a section of the buffer, normally you want to lock the whole buffer so use 0 in both of these.
- data - this is the returned address of the data in the buffer. You must declare a pointer to the type of data in the buffer and pass the address in this parameter. If successful after the lock the pointer will point to the vertex data
- flags - combination of flags that define the type of lock you wish to perform. These are useful for increasing speed. e.g. if you do not want to keep existing data in the buffer but just want to overwrite it you can specify D3DLOCK_DISCARD, this can cause a speed increase. See the notes on D3D Resources for further details.
So using our example again, to lock the buffer we would:
CUSTOMVERTEX* pVertices;
m_vb->Lock( 0, 0, (void**)&pVertices, 0 ));
The only difficult thing above is the way we convert our custom vertex pointer to the required pointer for the call. The call requires a void pointer so we have to specify void** to convert it. Note: any pointer can be converted to a void pointer. A void pointer is a handy thing (but dangerous) as it can be used to point to anything - you do not have to specify a type.
You now have a pointer to the vertex data. You can use this like an array. e.g. to set the position:
pVertices[0].pos.x=10.0f;
pVertices[0].pos.y=20.0f;
pVertices[0].pos.z=30.0f;
Once you have finished writing your data you must unlock the vertex buffer, this is simple:
m_vb->Unlock();
Index Buffers
To specify which of the vertex in the vertex buffer make up each triangle you need to create and fill an index buffer. So in the above example if it defines the 4 vertex around a square like this:
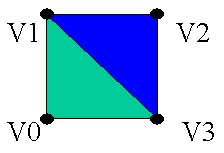
To draw the two triangles shown above we will need to specify which vertex are used for which triangle:
Triangle 0 (green one) uses vertex V0, V1 and V3
Triangle 1 (blue one) uses vertex V3, V1 and V2
Note: it is essential that you define the vertex in a clockwise rotation. DirectX uses the left handed co-ordinate system.
Our index buffer is just one big array with every 3 entries representing the vertex used in that triangle. So for the above the vertex buffer will look like this:
0,1,3,3,1,2
Note that for 2 triangles we have 6 entries. The number of entries in an index buffer must always be 3 times the number of triangles.
Creating
As before we declare a pointer to an index buffer object and call an API function that creates the object and points our pointer at it.
LPDIRECT3DINDEXBUFFER9 m_ib;
HRESULT CreateIndexBuffer( UINT Length, DWORD Usage, D3DFORMAT Format, D3DPOOL Pool, IDirect3DIndexBuffer9** IndexBuffer, HANDLE* Handle );
- Length - size of the index buffer in bytes. An index is normally 2 bytes (a WORD) so the size for the above in bytes will be number of triangles * 3 * 2 bytes, so it will be 12
- Usage - as with the vertex buffer you can indicate how you will use this buffer. Again it is advisable to use: D3DUSAGE_WRITEONLY. See the notes on D3D Resources for further details.
- Format - the size of an index. A lot of cards only support 2 bytes (16 bits) so prefer D3DFMT_INDEX16
- Pool - memory pool, leave it up to Direct3D by specifying D3DPOOL_MANAGED. See the notes on D3D Resources for further details.
- IndexBuffer - this is where you pass in the address of your index buffer &m_ib, if the call is successful it will be set to point to an index buffer instance
- Handle - not used, always set to NULL
An example of creating an index buffer might be:
gD3dDevice->CreateIndexBuffer(6*3*2,D3DUSAGE_WRITEONLY, D3DFMT_INDEX16, D3DPOOL_MANAGED, &m_ib, NULL)
Filling the index buffer
As with the vertex buffer to fill an index buffer we must lock it, write our data and unlock it. The parameters are the same so an example only is given here:
WORD *indices=NULL;
m_ib->Lock( 0, 0, (void**)&indices, 0 );
After this call the indices pointer points to the memory area where the indices are held. We can write to this area using array notation. So to specify the vertex for our two triangles we would do this:
indices[0]=0;
indices[1]=1;
indices[2]=3;
indices[3]=3;
indices[4]=1;
indices[5]=2;
We must then unlock the buffer:
m_ib->Unlock();
The Next Step
Now that we have seen how to create vertex and index buffers the next step is to render their contents. See the next notes on rendering the triangles: Rendering Steps
© 2004-2016 Keith Ditchburn